Now that we know and love the way of the asynchronous batch request in Shindig, it is time for us to add our own data retrieval for the course-related information and provide that information for Learning Gadget. If you look at the existing pattern in the “Social Hello World” gadget, you see the pattern where the gadget simply takes the data that is returned as part of each request and uses it. In my gadget, I want to add a bit of an abstraction layer and let the user use a set of accessor methods so the pattern is a little different.
You might want to grab a copy of the completed code for reference as we go forward:
- Code for java/social-api/src/main/java/org/apache/shindig/social/opensocial/service/LearningHandler.java
-
Code for
features/src/main/javascript/features/learning/learning_client.js
The first thing we need to do is build a getInfo method and add it to our osapi.learning service. Our code gets a little larger and we need some more imports.
java/social-api/src/main/java/org/apache/shindig/social/opensocial/service/LearningHandler.java
package org.apache.shindig.social.opensocial.service;

import java.util.Map;
import java.util.HashMap;
import java.util.concurrent.Future;
import org.apache.shindig.auth.SecurityToken;
import org.apache.shindig.protocol.DataCollection;
import org.apache.shindig.protocol.Service;
import org.apache.shindig.protocol.Operation;
import org.apache.shindig.common.util.ImmediateFuture;

@Service(name = "learning")
public class LearningHandler {

  @Operation(httpMethods = "GET")
  public Future<DataCollection> getInfo(SocialRequestItem request) {
    SecurityToken token = request.getToken();
    System.out.println("Owner="+token.getOwnerId()+" viewer="+token.getViewerId());

    // This data *should* come from an SPI ...
    Map<String, Map<String, String>> results = new HashMap<String, Map<String, String>>();
    Map<String, String> data = new HashMap<String, String>();
    data.put("context_label","SI124");
    data.put("context_title","Network Thinking");
    results.put("info", data);

    DataCollection dc = new DataCollection(results);
    return ImmediateFuture.newInstance(dc);
  }

  @Operation(httpMethods = "GET")
  public void setOutcome(SocialRequestItem request) {
    System.out.println("Param = "+request.getParameter("outcome","default"));
    // Do something clever here like call an SPI ...
  }
}
We need to construct a DataCollection which is a map of maps. This gets turned into JSON or REST by magic code that is calling us. We name the top map info and put two fields into the second-level map. There is a bit of clunkiness for all of this but the JSON/REST symmetry is probably worth it.
Again, since we are in a hurry, we will just call the service directly at the moment of gadget startup:
gadgets.window.setTitle('Social Hello World');
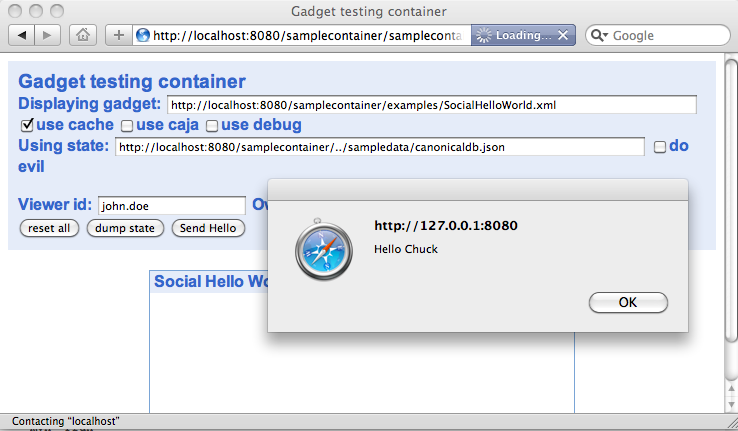
osapi.learning.getInfo().execute(function(result) {
if (result.error) {
alert('Error on retrieval');
} else {
alert('Name '+result.info.context_label);
}
}) ;
var hellos = new Array('Hello World', 'Hallo Welt', 'Ciao a tutti',
You see the asynchronous pattern and we simply pull the info object apart and directly look up the context_label that was placed in there by the service.
But this is not batch-friendly. So lets do this in a more batch friendly manner by making the following changes after undoing the above changes.
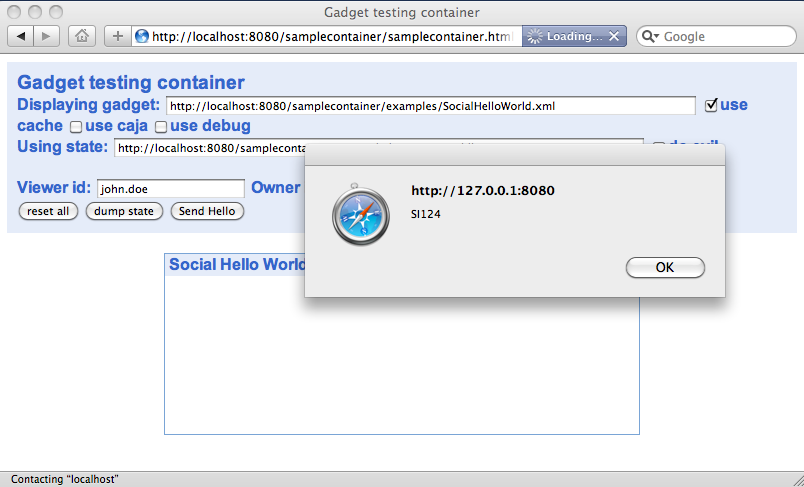
     function render(data) {
       alert('Render Label ' + data.learningData.info.context_label);
       var viewer = data.viewer;
       allPeople = data.viewerFriends.list;
    ...
     function initData() {
       var fields = ['id','age','name','gender','profileUrl','thumbnailUrl'];
       var batch = osapi.newBatch();
       batch.add('viewer', osapi.people.getViewer({sortBy:'name',fields:fields}));
       batch.add('viewerFriends', osapi.people.getViewerFriends({sortBy:'name',fields:fields}));
       batch.add('viewerData', osapi.appdata.get({keys:['count']}));
       batch.add('viewerFriendData', osapi.appdata.get({groupId:'@friends',keys:['count']}));
       batch.add('learningData', osapi.learning.getInfo());
       batch.execute(render);
     }
Now we have piggybacked the retrieval of our learning information along with all of the other OpenSocial requests that our gadget needs to do. So we make one request, get one response, and have access to the learning data along with the Open Social data when we are making our initial render of the widget.
Now if you like, you can stop now as you have seen how to retrieve data from the server and do so in concert with the rest of a gadget’s batch requests.
But for me, I wanted a little more abstraction and I wanted my gadget to be provisioned so that a tool could use my learning feature over and over whenever it liked and anywhere in the gadget code. So I make a few changes to my feature to make this possible.
First I put in an instance variable, a setter to store the info from getInfo and changes to my accessor methods getContextLabel and getContextTitle as follows:
learning/learning_client.js
gadgets.learning = (function() {

    var info = null;

    // Create and return our public functions
    return {
        ...
        setInfo : function(learninginfo) {
            info = learninginfo.info;
        },

        getContextLabel : function() {
            if ( info ) {
               return info.context_label;
            } else {
               return null;
            }
        },

        getContextName : function() {
            if ( info ) {
               return info.context_title;
            } else {
               return null;
            }
        },
    };

})();
I also then make the following changes to the “Social Hello World” gadget:
     function render(data) {
       gadgets.learning.setInfo(data.learningData);
       alert('Gadget Label ' +  gadgets.learning.getContextLabel());
       var viewer = data.viewer;
       allPeople = data.viewerFriends.list;
    ...
     function initData() {
       var fields = ['id','age','name','gender','profileUrl','thumbnailUrl'];
       var batch = osapi.newBatch();
       batch.add('viewer', osapi.people.getViewer({sortBy:'name',fields:fields}));
       batch.add('viewerFriends', osapi.people.getViewerFriends({sortBy:'name',fields:fields}));
       batch.add('viewerData', osapi.appdata.get({keys:['count']}));
       batch.add('viewerFriendData', osapi.appdata.get({groupId:'@friends',keys:['count']}));
       batch.add('learningData', osapi.learning.getInfo());
       batch.execute(render);
     }
I still add the osapi.learning.getInfo to the batched request, but instead of using the returned info data directly, I call setInfo to pass it into my learning feature to provision it and then call the getContextLabel accessor method.
This has the advantage that now any accessor method for my learning feature can be called anywhere in the gadget including much later in the processing since the gadget is fully provisioned.
If you look at the full source code, you will see another provisioning pattern called loadInfo I included it for completeness but I only think it would be useful if a gadget was not going to retrieve any other data except for learning data from the server at startup. A normal gadget will likely need plenty of OpenSocial data from several services so the batch pattern will be the right pattern.
So this brings us to the conclusion of this little tutorial series on how to add a feature and service to Shindig. I have tried to keep the sample code and length of the examples to the absolute minimum to give you a skeleton to hang your own code on.
I also have not explored the System Program Interface (SPI) pattern at all here. If I were to develop the LearningHandler to be real code, I would immediately build a Learning SPI interface to make the Handler be reusable code with a number of different LMS systems.
So, if you have gotten this far, thanks for taking the time to read all of this. If you are a Shindig wizard and I missed something obvious – please drop me a note and tell me where I missed the boat. I am truly a Shindig beginner having only downloaded the code two weeks ago – so the patterns might have been lost on me.
I do think that it would be a good idea in Shindig to make these kinds of extensions possible without code hacking. Perhaps this outline shows a pattern where we can use Guice to find and register both client features as well as serve-side elements. But that will be for another time. I need to prepare for the July 4 barbecue today.
— End of Shindig Post Series —